
Continuous bladder irrigation is a procedure usually required for two common reasons. One is that it is done in order to decrease the chances of the formation of blood clots in the bladder right after certain kinds of surgery. Second is to administer medication into the bladder in order to ward off an infection or maybe for other reasons. At times, there is a need for constant monitoring, to be certain that no complications may happen.
DEFINITION
Continuous bladder irrigation is an ongoing infusion of a sterile solution into the bladder, generally by utilizing a three-way irrigation closed system that has a triple-lumen catheter. One lumen is for draining urine; another for inflating the catheter balloon, and the last one is for carrying the irrigation solution.
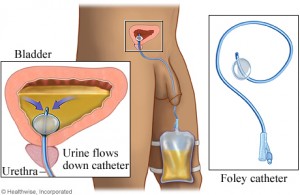
Image credit: primumn0nn0cere.wordpress.com
PURPOSE
To prevent the formation of blood clot, permit urine free flow of urine and sustain patency of indwelling catheter (IDC), by the continuousirrigation of the bladder with the use of normal saline.
EXPECTED OUTCOMES
- The urinary catheter stays patent and urine is drained freely through the IDC
- Patient comfort is preserved
- Reduced or prevented formation of clot in the bladder or the IDC
- Reduced risk of urinary tract infection by using aseptic technique in connecting the bladder irrigation to the IDC
EQUIPMENT
- Non sterile gloves
- Personal protective equipment (PPE)
- 0.9% sodium Chloride irrigation bags as per facility policy
- Chlorhexidine 0.5% with 70% alcohol wipes
- Continuous bladder irrigation set, closed urinary drainage bag with anti-reflux valve.
- 3-way catheter
- Underpad
- • IV pole
PROCEDURE – RATIONALE
- Explain the procedure to the patient and provide privacy. –This is to keep patient informed and comfortable
- Place the patient in a position for easy access to the catheter while preserving his comfort. – This will help save time and effort and keep the patient comfortable.
- Make sure that the patient has a three-way urinary catheter otherwise, a three-way catheter has to be inserted. – A three-way catheter is needed to allow for different fluids to pass through the set.
- Place the irrigation flasks on the IV pole and prime irrigation set, upholding asepsis of the irrigation set. – To prevent infection and other complications.
- See to it that only one of the irrigation flask clamps have been opened when priming the irrigation set or else the fluid can run from one flask to another. After the irrigation set has been primed, make sure that every clamp on the irrigation set is closed.
- Put on goggles and impermeable gown, place underpad beneath the catheter connection. – In order to maintain sterility and keep from contamination.
- Wash hands and put on non sterile gloves. – To decrease the risk of spreading bacteria and contamination.
- Swab the IDC irrigation as well as catheter ports with chlorhexidine swabs and let dry. – To prevent contamination.
- Remove the valve from the irrigation lumen of the catheter with the use of sterile gauze and discard valve. – To initiate irrigation.
- Attach the irrigation set to the irrigation lumen of the catheter, sustaining a clean procedure. – This is to prevent spread of bacteria and risk of contamination.
- Remove valve or old drainage bag from the catheter lumen with the use sterile gauze and put on catheter drainage bag while still maintaining clean procedure. – To prevent the spread of bacteria and risk of contamination.
- Make sure that you do not start bladder irrigation until urine is freely draining.
- Unclamp the irrigation flask which was used to prime the irrigationset and adjust the roller clamp to set the rate of administration. – To start the procedure and meet the goals of the procedure.
- Document procedure done and include urine color, level of hematuria, urine output, and patient’s reaction. – Documentation is proof that procedure was done and to record the patient’s progress.