Notes

Nasogastric Tubes
A nasogastric tube is a narrow bore tube passed into the stomach via the nose. It is used for short- or medium-term nutritional support, and also for aspiration of stomach contents – eg, for decompression of intestinal obstruction.
Types of Intestinal Tubes
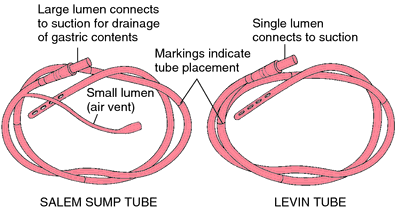
- Levin Tube – single lumen
- Suctioning gastric contents
- Administering tube feedings
- Salem Sump Tube – double lumen (smaller blue lumen vents the tube & prevents suction on the gastric mucosa, maintains intermittent suction regardless of suction source)
- Suctioning gastric contents
- Maintaining gastric decompression
Key Points
- Prior to insertion, position the client in High-Fowler’s position if possible.
- Use a water-soluble lubricant to facilitate insertion
- Measure the tube from the tip of the client’s nose to the earlobe and from the nose to the xiphoid process to determine the approximate amount of tube to insert to reach the stomach
- Flex the client’s head slightly forward; this will decrease the chance of entry into the trachea
- Insert the tube through the nose into the nasopharyngel area; ask the client to swallow, and as the swallow occurs, progress the tube past the area of the trachea and into the esophagus and stomach. Withdraw tube immediately if client experiences respiratory distress
- Secure the tube to the nose; do not allow the tube to exert pressure on the upper inner portion of the nares
- Validating placement of tube.
- Aspirate gastric contents via a syringe to the end of the tube
- Measure ph of aspirate fluid
- Place the stethoscope over the gastric area and inject a small amount of air through the NGT. A characteristic sound of air entering the stomach from the tube should be heard
- Characteristics of nasogastric drainage:
- Normally is greenish-yellowish, with strands of mucous
- Coffee-ground drainage – old blood that has been broken down in the stomach
- Bright red blood – bleeding from the esophagus, the stomach or swallowed from the lungs
- Foul-smelling (fecal odor) – occurs with reverse peristalsis in bowel obstruction; increase in amount of drainage with obstruction
Intestinal Tubes
Provide intestinal decompression proximal to a bowel obstruction. Prevent/decrease intestinal distention. Placement of a tube containing a mercury weight and allowing normal peristalsis to propel tube through the stomach into the intestine to the point of obstruction where decompression will occur
Types of Intestinal Tubes
- Cantor and Harris Tubes
- Approximately 6-10 feet long
- Single lumen
- Mercury placed in rubber bag prior to tube insertion
- Miller-Abbot Tubes
- Approximately 10 feet long
- Double lumen
- One lumen utilized for aspiration of intestinal contents
- Second lumen utilized to instill mercury into the rubber bag after the tube has been inserted into the stomach
Nursing Implications
- Maintain client on strict NPO
- Initial insertion usually done by physician and progression of the tube may be monitored via an X-ray
- After the tube has been placed in the stomach, position client on the right side to facilitae passage through the pyloric valve
- Advance the tube 2 to 4 inches at regular intervals as indicated by the physician
- Encourage activity, to facilitate movement of the tube through the intestine
- Evaluate the type of gastric secretions being aspirated
- Do not tape or secure the tube until it has reached the desired position
- Tubes may attached to suction and left in place for several days
- Offer the client frequent oral hygiene, if possible offer hard candy or gum to reduce thirst
- Removal of the tube depends on the relief of the intestinal obstruction
- May be removed by gradual pulling back (4-6 inches per hour) and eventual removal via the nose or mouth
- May be allowed to progress through the intestines and expelled via the rectum.
How to Insert a Nasogastric (NG) Tube
- Check physician’s order.
- Check client’s identaband and if able have client state name.
- Discuss procedure to client.
- Provide privacy.
- Gather equipment.
- Position client at 45 degree angle or higher with head elevated.
- Wash hands and don clean gloves.
- Provide regular oral and nasal hygiene.
- Remove gloves and wash hands.
- Position client for comfort.
- Document procedure.
Confirming Placement of NGT
1. Assess pH
Aspirating fluid to assess its pH content and appearance and confirm correct placement is another important part of the insertion protocol. Gastric contents will always be acidic (< 5.6 pH), while fluid from the pulmonary tract will be alkaline (>6 pH)
However, measuring the pH level alone does not differentiate between respiratory and gastrointestinal placement of the tube; both sites can have high pH values (> 6).The pH test has no value if the patient is receiving acid suppression medication.
2. Assess color of gastric fluid
One study investigated the use of visual inspection of feeding tube aspirates in identifying feeding tube location in the respiratory or GI tracts. It was concluded that observation of the visual characteristics of feeding tube aspirates is of little value in differentiating between respiratory and GI placement.
Gastric fluid is usually grassy green or colorless, with shreds of off-white to tan mucus, while intestinal fluid tends to be golden and translucent. Pleural fluid is typically off-white or pale yellow.
3. Though it has been common practice, auscultation is not a reliable indicator of correct NGT placement.
Be aware that the common practice of instilling air into the tube via syringe and auscultating over the stomach for a “swoosh” sound is not a reliable indicator of proper tube placement since an NG tube in the respiratory tract can transmit a similar sound.
Studies indicate that auscultation is not a reliable method to differentiate gastric and respiratory placement
4. X-ray
The gold standard for confirming tube placementis an X-rayespecially in a critically ill, elderly, dysphagic or unconscious patient. Many facilities require radiologic confirmation before using the NG tube for feeding or medication administration. It’s also essential when your evaluation of aspirated fluid is inconclusive.
5. Other clinical methods of detecting tube placement may be unreliable
In cases where the patient may have suppressed gag or cough reflexes such as in the situations like decreased level of consciousness or neurologic debilitation, the absence of coughing or choking after placement of the tube may be misleading.
Once tube placement is confirmed, the nurse must then secure the tube to keep it from becoming dislodged. This may be done using aa split-tape method, which involves tearing off about four inches of tape and splitting it lengthwise to about the halfway point. After creating tabs on the split ends, tape the un-split end to the end of the nose and crisscross the split ends around the tube.
Removing a Nasogastric Tube
Objectives
- To check if the patient can tolerate oral feeding.
Contraindications
- Continuing need for feeding/suction.
After Care
- Discard the disposasble equipment used.
- Wash your hands.
- Position the patient in a comfortable or in his desired position.
Charting
- Record date of removal of nasogastric tube.
- Record client’s response.
- Record measurement of drainage.
Equipment
- Tissues
- Plastic disposable bag
- Bath towel or disposable pad
- Clean disposable glove
Nursing Alert: Removal is easier with the patient in semi-Fowler’s position.
Nursing Interventions & Rationale
| Nursing Intervention | Rationale |
| Check physician’s order for removal of nasogastric tube. | Ensures correct implementation of physician’s order. |
| Explain procedure to client. | Explanation facilitates client cooperation.. |
| Gather equipment. | Provides for organized approach to task. |
| Wash your hands. Don clean disposable glove on hand that will remove tube. | Handwashing deters the spread of microorganisms. Gloves protect hand from contact with abdominal secretions. |
| Discontinue suction and separate tube from suction. Unpin tube from cleint’s gown and carefully remove adhesive tape from bridge of nose. | Allows for unrestricted removal of nasogastric tube. |
| Place towel or disposable pad across client’s chest. Hand tissues to client. | Protects client from contact with gastric secretions. Tissues are necessary if client wishes to blow his nose when tube is removed. |
| Instruct client to take a deep breath and hold it. | Prevents accidental aspiration of any gastric secretions in tube. |
| Clamp tube with fingers. Quickly and carefully remove tube while client holds his breath. | Minimizes trauma and discomfort for client. Clamping prevents any drainage of gastric contents in tube. |
| Place tube in disposable plastic bag. Remove glove and place in bag. | Prevents contamination with any microorganisms. |
| Offer mouth care to client and make client feel comfortable. | Provides comfort. |
| Measure nasogastric drainage. Remove all equipment and dispose according to agency policy. Wash your hands. | Measuring nasogastric drainage provides for accurate recording of output. Proper disposal deters spread of microorganisms. |
| Record removal of nasogastric tube, client’s response, and measurement of drainage. | Facilitates documentation and provides for comprehensive care. |
Irrigating a Nasogastric Tube
A nasogastric tube is irrigated regularly to determine/ensure the patency of the tube. Learn how to irrigate a nasogastric tube (NGT).
Objective
- To ensure the patency of the nasogastric tube.
Indication
- Stomach contents fail to flow through tube.
Contraindication
- Some tubes are maintained by airflow, not normal saline solution.
Nursing Alert: Connect proper end (main lumen) of double lumen tube to suction. The short lumen is an airway, not a suction-drainage tube. With double-lumen tube, if main lumen is probably blocked, clear the main lumen, then inject up to 60 cc of air through the short lumen above the level of the stomach where the end of the main lumen is located.
Equipment
- Nasogastric tube connected to continuous or intermittent suction.
- Irrigation or Toomey syringe and container for irrigating solution.
- Normal saline for irrigation.
- Disposable pad or bath towel
- Disposable gloves (optional)
- Stethoscope
- Clamp
Nursing Interventions & Rationale
| Nursing Interventions | Rationale |
| Check physician’s order for irrigation. Explain procedure to client. | Clarifies schedule and irrigating solution. An explanation encourages client cooperation and reduces apprehension. |
| Gather necessary equipment. Check expiration dates on irrigating saline and irrigation set. | Provides for organized approached to task. Agency policy dictates safe interval for reuse of equipment. |
| Wash your hands. | Handwashing deters the spread of microorganisms. |
| Assist client to semi-Fowler’s position unless this is contraindicated. | Minimizes risk of aspiration. |
Check placement of NG tube;
|
|
| Clamp suction tubing near connection site. Disconnect NG tube from suction apparatus and lay on disposasble pad or towel. | Protects client from leakage of NG drainage. |
| Pour irrigating solution into container. Draw up 30 ml of saline (or amount ordered by physician) into syringe. | Delivers measured amount of irrigant through NG tube. Saline compensates for electrolytes lost through NG drainage. |
| Place tip of syringe in NG tube. Hold syringe upright and gently insert the irrigant (or allow solution to flow in by gravity if agency or physician indicates). Do not force solution into NG tube. | Position of syringe prevents entry of air into stomach. Gentle insertion of saline (or gravity insertion) is less traumatic to gastric mucosa. |
| If unable to irrigate tube, reposition client and attempt irrigation again. Check with physician if repeated attempts to irrigate tube fail. | Tube may be positioned against gastric mucosa making it difficult to irrigate. |
| Withdraw or aspirate fluid into syringe. If no return, inject 20 ml of air and aspirate again. | Inject of air may reposition the end of tube. |
| Reconnect NG tube to suction. Observe movement of solution or drainage. | Determine patency of NG tube and correct operation of suction apparatus. |
| Measure and record amount and description of irrigant and return solution. | Irrigant placed in NG tube is considered intake: solution returned is recorded as output. |
| Rinse equipment if it will be reused. | Promotes cleanliness and prepares equipment for next irrigation. |
| Wash your hands | Handwashing deters the spread of microorganisms. |
| Record irrigation procedure, description of drainage and client’s response. | Facilitates documentation of procedure and provides for comprehensive care. |