
A tracheostomy is a surgical procedure to create an opening through the neck into the trachea (windpipe). A tube is usually placed through this opening to provide an airway and to remove secretions from the lungs. This tube is called a tracheostomy tube or trach tube.
Definition of Terms
- Decannulation: The process whereby a tracheostomy tube is removed once patient no longer needs it.
- Humidification: The mechanical process of increasing the water vapour content of an inspired gas.
- Stoma: An opening, either natural or surgically created, which connects a portion of the body cavity to the outside environment (in this case, between the trachea and the anterior surface of the neck).
- Tracheostomy: A surgical procedure to create an opening between 2-3 (3-4) tracheal rings into the trachea below the larynx.
- Tracheal Suctioning: A means of clearing thick mucus and secretions from the trachea and lower airway through the application of negative pressure via a suction catheter.
- Tracheostomy tube: A curved hollow tube of rubber or plastic inserted into the tracheostomy stoma (the hole made in the neck and windpipe (Trachea) to relieve airway obstruction, facilitate mechanical ventilation or the removal of tracheal secretions.
Components of Tracheostomy Tube
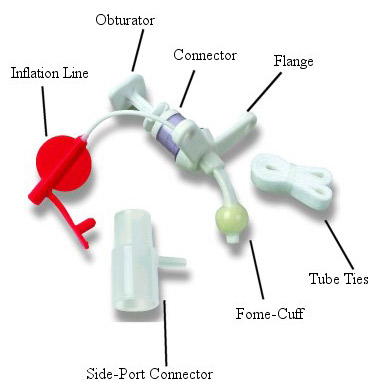
- Outer tube
- Inner tube: Fits snugly into outer tube, can be easily removed for cleaning.
- Flange: Flat plastic plate attached to outer tube – lies flush against the patient’s neck.
- 15mm outer diameter termination: Fits all ventilator and respiratory equipment.
All remaining features are optional
- Cuff: Inflatable air reservoir (high volume, low pressure) – helps anchor the tracheostomy tube in place and provides maximum airway sealing with the least amount of local compression. To inflate, air is injected via the…
- Air inlet valve: One way valve that prevents spontaneous escape of the injected air.
- Air inlet line: Route for air from air inlet valve to cuff.
- Pilot cuff: Serves as an indicator of the amount of air in the cuff
- Fenestration: Hole situated on the curve of the outer tube – used to enhance airflow in and out of the trachea. Single or multiple fenestrations are available.
- Speaking valve / tracheostomy button or cap: Used to occlude the tracheostomy tube opening (a) former – during expiration to facilitate speech and swallow, (b) latter – during both inspiration and expiration prior to decannulation.
Providing Tracheostomy Care
- Explain procedure to patient.
- If tracheostomy tube has been suctioned, remove soiled dressing from around tube and discard with gloves on removal.
- Perform hand hygiene and open necessary supplies.
Cleaning A Nondisposable Inner Cannula
- Prepare supplies before cleaning inner cannula.
- Open tracheostomy care kit and separate basins, touching only the edges. If kit is not available, open two sterile basins.
- Fill one basin fraction ½-inch (1.25 cm) deep with hydrogen peroxide.
- Fill other basin fraction ½-inch (1.25 cm) deep with saline.
- Open sterile brush or pipe cleaners if they are not already in cleaning kit. Open additional sterile gauze pad.
- Don disposable gloves.
- Remove oxygen source if one is present. Rotate lock on inner cannula in a counterclockwise motion to release it.
- Gently remove inner cannula and carefully drop it in basin with hydrogen peroxide. Remove gloves and discard.
- Clean inner cannula.
- Don sterile gloves.
- Remove inner cannula from soaking solution. Moisten brush or pipe cleaners in saline and insert into tube, using back-and-forth motion.
- Agitate cannula in saline solution. Remove and tap against inner surface of basin.
- Place on sterile gauze pad.
- Suction outer cannula using sterile technique.
- Replace inner cannula into outer cannula. Turn lock clockwise and make sure that inner cannula is secure. Reapply oxygen source if needed.
Replacing Disposable Inner Cannula
- Release lock. Gently remove inner cannula and place in disposable bag. Discard gloves and don sterile ones to insert new cannula. Replace with appropriately sized new cannula. Engage lock on inner cannula.
Applying Clean Dressing and Tape
- Dip cotton-tipped applicator in saline and clean stoma under faceplate. Use each applicator only once, moving from stoma site outward.
- Apply hydrogen peroxide to area around stoma, faceplate, and outer cannula if secretions prove difficult to remove. Rinse area with saline.
- Pat skin gently with dry 4 x 4 gauze.
- Slide commercially prepared tracheostomy dressing or prefolded non-cotton-filled 4 x 4 dressing under faceplate.
- Change tracheostomy tape.
- Leave soiled tape in place until new one is applied.
- Cut piece of tape that is twice the neck circumference plus 4 inches (10 cm). Trim ends on the diagonal.
- Insert one end of tape through faceplate opening alongside old tape. Pull through until both ends are even.
- Slide both tapes under patient’s neck and insert one end through remaining opening on other side of faceplate. Pull snugly and tie ends in double square knot. Check that patient can flex neck comfortably.
- Carefully remove old tape. Reapply oxygen source if necessary.
- Remove gloves and discard. Perform hand hygiene. Assess patient’s respirations. Document assessments and completion of procedure.
Lifespan Considerations
Infant and Child
- An assistant may be necessary during tracheostomy care to prevent active children from dislodging or expelling their tracheostomy tubes.
- Always make a sterile, packaged tracheostomy available at bedside for emergency purposes.
- Encourage parents to participate with the procedure in an effort to comfort the child and promote client teaching.
- Care for the skin at the tracheostomy site is important especially for the elders whose skin is more fragile and prone to breakdown.
Home Care Modifications
- Emphasize the importance of handwashing before performing tracheostomy care.
- Describe the function of each part of the tracheostomy tube.
- Explain the proper way on how to remove, change, and replace the inner cannula.
- Clean the inner cannula two or three times a day.
- Check and clean the tracheostomy stoma.
- Suction tracheal secretions if necessary.
- Assess for symptoms of infection (i.e., increased temperature, increased amount of secretions, change in color or odor of secretions).
- Advise and encourage parents to participate with the procedure in an effort to comfort the child and promote client teaching.
- Provide contact information for emergencies.
Suctioning a Tracheostomy Tube
Suctioning of tracheostomy tube is only done as necessary. Sterile technique must be observed. Nurses should be aware that there is a frequency for the need of suctioning during immediate postoperative period.
Purposes
- Removes thick mucus and secretions from the trachea and lower airway to maintain patent airway and prevent airway obstructions
- To promote respiratory function (optimal exchange of oxygen and carbon dioxide into and out of the lungs)
- To prevent pneumonia that may result from accumulated secretions
Assessment
- Assess the client for the presence of congestion on auscultation of the thorax.
- Note the client’s ability or inability to remove the secretions through coughing.
Planning
Suctioning a tracheostomy or endotracheal tube is a sterile, invasive technique requiring application of scientific knowledge and problem solving. This skill is performed by a nurse or respiratory therapist and is not delegated to UAP.
Equipment
- Resuscitation bag (Ambu bag) connected to 100% oxygen
- Sterile towel (optional)
- Equipment for suctioning
- Goggles and mask if necessary
- Gown (if necessary) as Sterile gloves
- Moisture-resistant bag
Preparation
Determine if the client has been suctioned previously and, if so, review the documentation of the procedure. This information can be very helpful in preparing the nurse for both the physiologic and psychologic impact of suctioning on the client
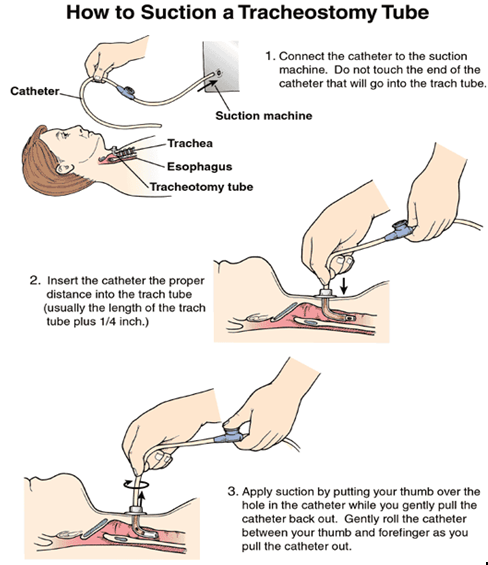
Procedure
- Explain the procedure to the patient and reassure him or her that you will interrupt the procedure if the patient indicates respiratory difficulty. Administer pain medication to postoperative patient before suctioning.
- Gather equipment and provide privacy for patient.
- Perform hand hygiene.
- Assist the patient to a semi-Fowler’s or Fowler’s position if conscious. An unconscious patient should be placed in the lateral position facing you.
- Turn suction to appropriate pressure.
- Wall unit
- Adult: 100 to 120 cm Hg
- Child: 95 to 110 cm Hg
- Infant: 50 to 95 cm Hg
- Portable unit
- Adult: 10 to 15 cm Hg
- Child: 5 to 10 cm Hg
- Infant: 2 to 5 cm Hg
- Wall unit
- Place clean towel, if being used, across patient’s chest. Don goggles, mask, and gown, if necessary.
- Open sterile kit or set up equipment and prepare to suction.
- Place sterile drape, if available, across patient’s chest.
- Open sterile container and place on bedside table or overbed table without contaminating inner surface. Pour sterile saline into it.
- Hyperoxygenate patient using manual resuscitation bag or sigh mechanism on mechanical ventilator.
- Don sterile gloves or one sterile glove on dominant hand and clean glove on nondominant hand.
- Connect sterile suction catheter to suction tubing held with unsterile gloved hand.
- Moisten catheter by dipping it into the container of sterile saline, unless it is one of the newer silicone catheters that does not require lubrication.
- Remove oxygen delivery setup with unsterile gloved hand if it is still in place.
- Using sterile gloved hand, gently and quickly insert catheter into the trachea. Advance about 10 to 12.5 cm (4-5 inches) or until patient coughs. Do not occlude Y-port when inserting catheter.
- Apply intermittent suction by occluding Y-port with thumb and index finger of sterile gloved hand as catheter is being withdraw. Do not allow suctioning to continue for more than 10 seconds. Hyperventilate three to five times between suctioning or encourage patient to cough and deep breathe between suctioning.
- Flush catheter with saline and repeat suctioning as needed and according to patient’s tolerance of the procedure. Allow patient to rest at least 1 minute between suctioning, and replace oxygen delivery setup if necessary. Limit suctioning events to three times.
- When procedure is completed, turn off suction and disconnect catheter from suction tubing. Remove gloves inside out and dispose of gloves, catheter, and container with solution in proper receptacle. Perform hand hygiene.
- Adjust patient’s position. Auscultate chest to evaluate breath sounds.
- Record time of suctioning and nature and amount of secretions. Also note character of patient’s respirations before and after suctioning.
- Offer oral hygiene.
Lifespan Considerations
Infant and Child
- Restrain the child gently with the help of an assistant and maintain the child’s head in the midline position.
- To be aware of any special problems, do a thorough lung assessment before and after the whole procedure.
Home Care Considerations
- Encourage the client to clear airway by coughing, if possible.
- If cannot cough properly, encourage the client to suction their secretions.
- Advise the client or caregiver to use clean gloves in performing the procedure.
- The nurse should teach the caregiver on how to determine the need for suctioning.
- Discuss to the caregiver the correct process and rationale underlying the practice of suctioning.
- Emphasize the importance of adequate hydration as it thins secretions, which can aid in the removal of secretions by coughing or suctioning.
Dealing with Emergencies
If the tracheostomy tube falls out
- DON’T PANIC!
- Once the tracheostomy tube has been in place for about 5 days the tract is well formed and will not suddenly close.
- Reassure the patient
- Call for medical help.
- Ask the patient to breathe normally via their stoma while waiting for the doctor.
- The stay suture (if present) or tracheal dilator may be used to help keep the stoma open if necessary.
- Stay with patient.
- Prepare for insertion of the new tracheostomy tube
- Once replaced, tie the tube securely, leaving one finger-space between ties and the patient’s neck.
- Check tube position by (a) asking the patient to inhale deeply – they should be able to do so easily and comfortably, and (b) hold a piece of tissue in front of the opening – it should be “blown” during patient’s exhalation.
Patient is having Acute Dyspnea
Acute dyspnea for patient with tracheostomy is most commonly caused by partial or complete blockage of the tracheostomy tube retained secretions. To unblock the tracheostomy tube:
- ASK THE PATIENT TO COUGH: A strong cough may be all that is needed to expectorate secretions.
- REMOVE THE INNER CANNULA: If there are secretions stuck in the tube, they will automatically be removed when you take out the inner cannula. The outer tube – which does not have secretions in it – will allow the patient to breath freely. Clean and replace the inner cannula.
- SUCTION: If coughing or removing the inner cannula do not work, it may be that secretions are lower down the patients airway. Use the suction machine to remove secretions.
- If these measures fail – commence low concentration oxygen therapy via a tracheostomy mask, and call for medical assistance.
It is possible that the tracheostomy may have become displaced. Stay with the patient until assistance arrives. Prepare for change of tracheostomy tube.
Patient needing Cardiopulmonary Resuscitation
In the event of cardiopulmonary arrest, treat tracheostomy patients as other patients:
- Step 1: Expose the patient’s neck. Remove any clothing covering the tracheostomy tube and the neck area. Do not remove tracheostomy.
- Step 2: Check the patency of the inner cannula. To check inner cannula: Wearing a non-sterile glove, remove inner cannula. If clean, reinsert and lock into place. If soiled – replace. Continue resuscitation.
- Step 3: Ventilate. Use the ambu-bag directly to the t-tube.
- If unable to ventilate:
- Try to suction. To remove or clear the secretions blocking the tube.
- If still unable to ventilate. The tube may be displaced and the doctor may:
- Change the tube
- Intubate orally